Why Draw a Frog?
Before we start, it helps to know why frogs are such a great subject for beginners:
- They have simple body shapes.
- Their expressions can be cute, funny, or realistic.
- They help you practice drawing limbs, curves, and symmetry.
- Frogs are common in cartoons and illustrations.
Whether you’re drawing for fun, creating educational content, or developing your sketchbook, learning how to draw a frog is a useful skill.
Materials You’ll Need
You don’t need any fancy tools to begin drawing a frog. Here’s what you’ll need:
- Pencil (preferably an HB or 2B for sketching)
- Eraser
- Drawing paper or sketchbook
- Fine black pen or marker (for outlining)
- Colored pencils, markers, or crayons (optional, for coloring)
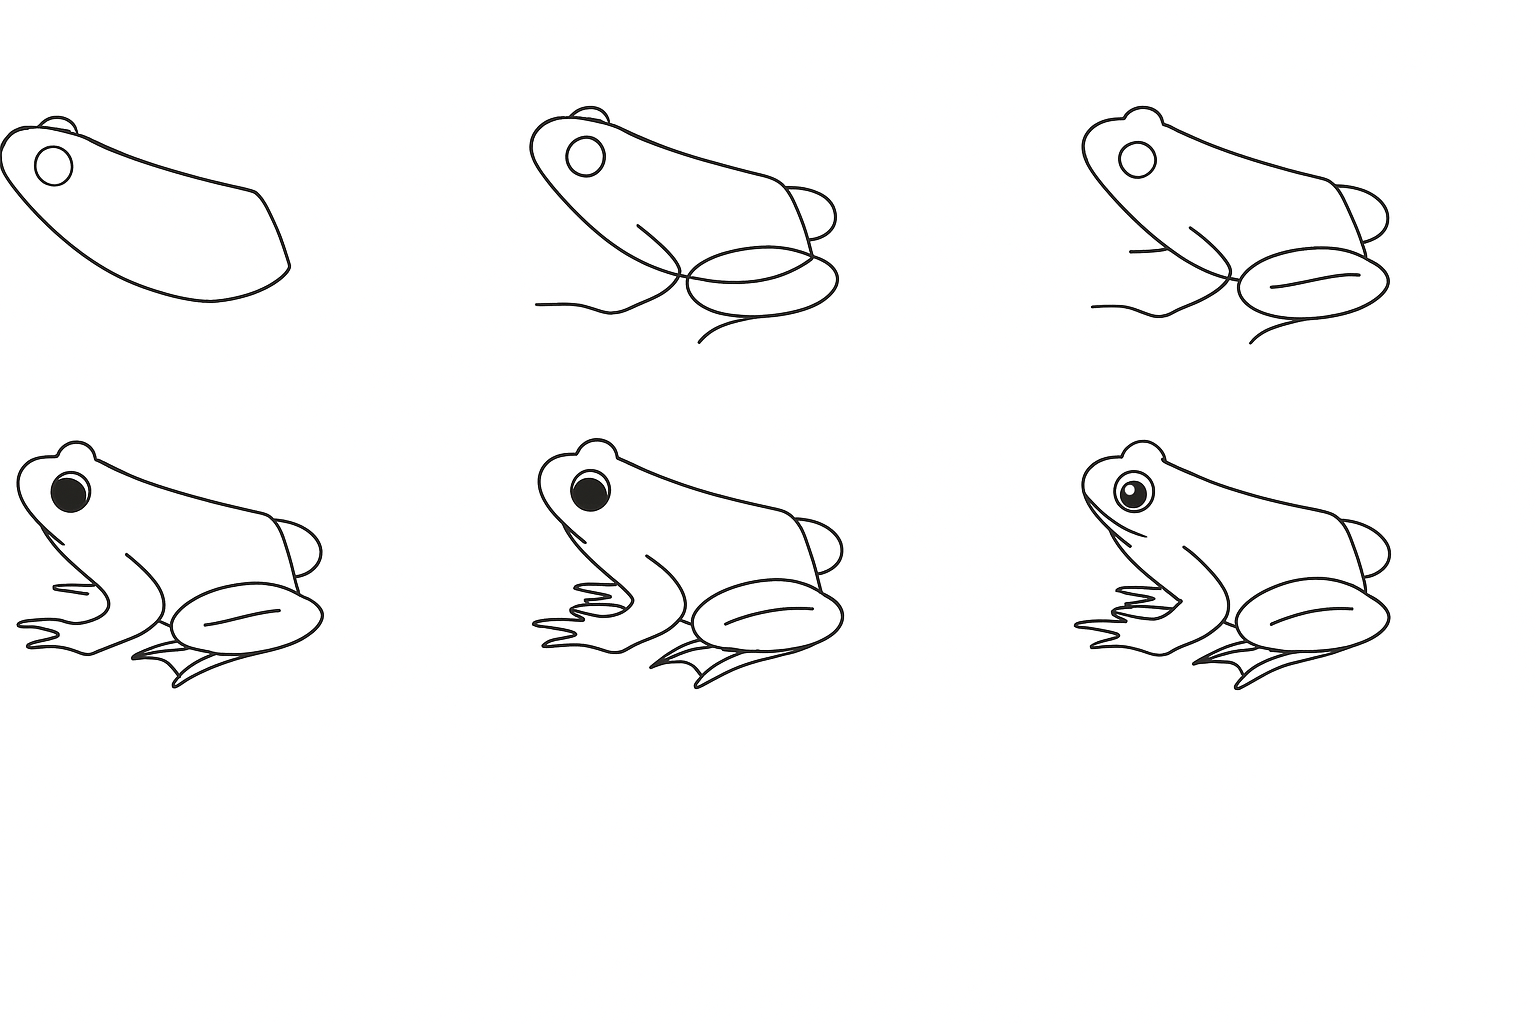
Step-by-Step Instructions: How to Draw a Frog
Follow these steps carefully to create your frog drawing. Take your time with each step. It’s okay to erase and try again!
Step 1: Draw the Frog’s Head
Start with a simple oval or circle shape. This will be the frog’s head. Frogs usually have a wide, rounded head with big eyes, so don’t worry about making it too perfect.
Tip: Make the top part of the oval slightly flatter if you want your frog to look more realistic.
Step 2: Sketch the Frog’s Eyes
Frog eyes are very unique—they sit on top of the head and are usually large and round.
- Draw two big circles at the top of the head.
- Inside each eye, draw a smaller black circle for the pupils.
- You can leave a little white space in the pupils to make the eyes look shiny and alive.
Step 3: Draw the Frog’s Body
From the head, sketch a larger oval shape or rounded body underneath. This should be slightly wider at the bottom and narrower near the neck area.
Tip: Think of a soft triangle with rounded edges, like a jellybean.
Step 4: Add the Frog’s Front Legs
Now let’s add the arms (front legs):
- Draw two curved lines coming down from both sides of the body.
- Add small oval shapes or long toes at the ends to represent frog fingers.
Frogs have long fingers with round tips. You can draw 3 or 4 fingers per hand depending on your style.
Step 5: Add the Frog’s Back Legs
The back legs are thicker and more muscular because frogs use them to jump.
- From the bottom of the body, draw two large bent lines or arcs for the thighs.
- Extend those into longer lower legs, curving backward and down.
- At the end, draw long toes—you can add webbing between them if you like.
This part might be tricky, so go slow and use light pencil strokes first.
Step 6: Add Details and Features
Now that the basic shape is ready, let’s give your frog some personality:
- Mouth: Draw a small curved line across the face. A smiley frog is always cute!
- Nostrils: Add two tiny dots above the mouth.
- Belly line: You can draw a curve across the lower body to separate the belly color.
- Skin texture (optional): Add small spots, warts, or bumps if you want a realistic frog.
Step 7: Outline Your Drawing
Once you’re happy with your pencil sketch, use a fine-tip black pen or marker to go over the lines. This will make your drawing stand out and look cleaner.
Tip: Wait for the ink to dry before erasing any pencil lines.
Step 8: Color Your Frog
Now for the fun part—coloring!
Frogs come in all colors: green, yellow, brown, red, and even blue! Feel free to get creative. For a classic cartoon frog:
- Body: Green
- Belly: Light yellow or cream
- Eyes: White with black pupils
- Spots: Dark green or black
Use crayons, colored pencils, or markers—whatever you enjoy!


Leave a Reply