Why You Might Want to Screen Record on Mac with Audio
Before we dive into the methods, let’s look at a few common reasons you might want to record your screen with audio:
- Creating tutorials or online courses
- Recording Zoom or Skype meetings
- Capturing streaming videos or webinars
- Demonstrating bugs or software issues
- Saving gameplay or app usage
- Making YouTube or social media content
Now, let’s explore how to do it properly on your Mac.
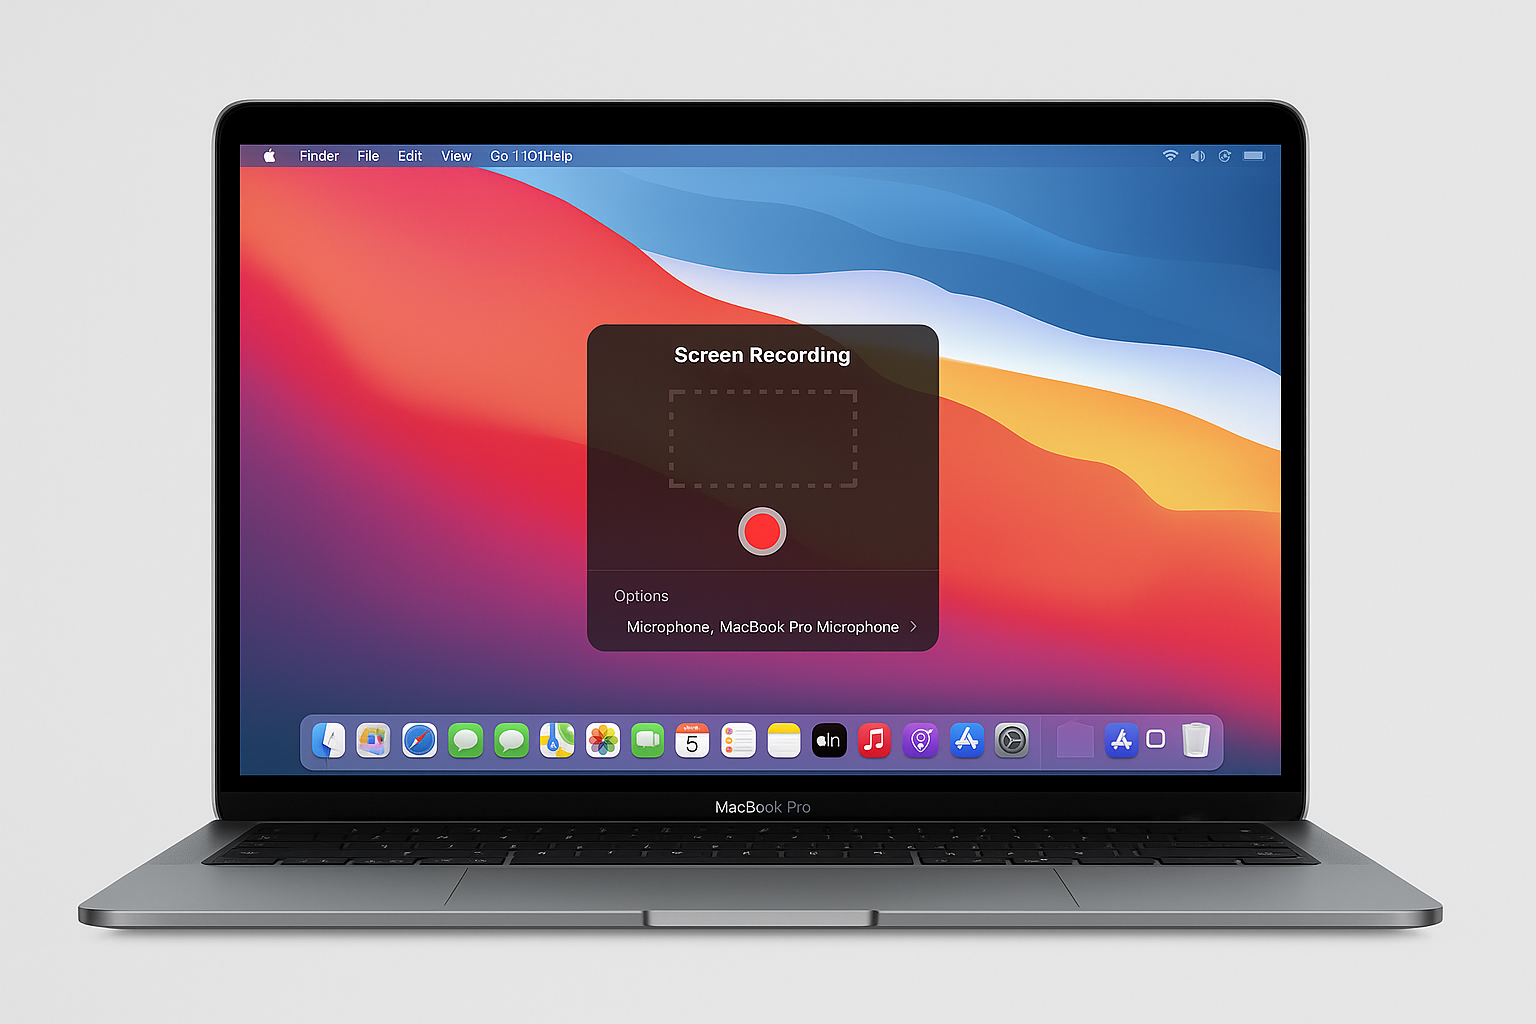
Method 1: Use the Built-In Screenshot Toolbar (macOS Mojave and Later)
Starting with macOS Mojave, Apple introduced an easy-to-use tool called the Screenshot Toolbar, which allows you to record your screen without installing any extra software.
Step-by-Step Instructions:
- Open the Screenshot Toolbar:
- Press
Command (⌘) + Shift + 5on your keyboard. - A control panel will appear at the bottom of your screen.
- Press
- Choose Recording Type:
- Click either Record Entire Screen or Record Selected Portion, depending on what you want to capture.
- Enable Audio Recording:
- Click Options.
- Under “Microphone,” select Built-in Microphone or any external microphone you have connected.
- Unfortunately, macOS does not allow system audio (the sound from your Mac) to be captured directly unless you use additional software (we’ll cover that below).
- Start Recording:
- Click Record.
- A small stop icon will appear in the menu bar.
- Stop Recording:
- Click the stop icon in the menu bar when you’re done.
- The recording will be saved to your desktop (or your selected destination).
Limitations:
- Cannot record internal system audio (e.g., YouTube, Zoom sounds) without third-party tools.
- Best suited for microphone narration.
Method 2: Use QuickTime Player (Comes Preinstalled on All Macs)
QuickTime Player is a built-in Mac app that can also record your screen and audio.
Step-by-Step Instructions:
- Open QuickTime Player:
- Use Spotlight (
Command + Space) and type “QuickTime Player,” then hit Enter.
- Use Spotlight (
- Start a New Screen Recording:
- Click File > New Screen Recording.
- Choose Audio Input:
- Click the small arrow next to the Record button.
- Select Built-in Microphone if you want to record your voice.
- Begin Recording:
- Click the red Record button.
- Choose whether to record the whole screen or drag to record a specific part.
- Stop the Recording:
- Click the stop button in the menu bar or use
Command + Control + Esc.
- Click the stop button in the menu bar or use
- Save Your Video:
- Click File > Save to store the video on your Mac.
Limitations:
- Does not record internal system audio unless you install an extra plugin.
- Very simple UI, not many editing features.
Method 3: How to Record Mac Screen with System Audio + Microphone Using Third-Party Tools
If you need to capture system audio (for example, sounds from a video, game, or call), you will need to install third-party software, because macOS restricts apps from accessing internal audio directly.
Recommended Tools:
1. OBS Studio (Free and Powerful)
OBS Studio is a free and open-source screen recorder used by streamers, gamers, and professionals.
How to Use OBS Studio with Audio:
- Download and Install OBS Studio from https://obsproject.com.
- Install Audio Capture Plugin:
- Install BlackHole (free audio routing tool) from https://existential.audio/blackhole/.
- Follow the instructions to set it up.
- Configure Audio:
- In OBS, go to Settings > Audio.
- Set Desktop Audio to “BlackHole 2ch”.
- Set Mic/Auxiliary Audio to “Built-in Microphone”.
- Add a Screen Source:
- Click the + in the “Sources” box and select Display Capture.
- Start Recording:
- Click Start Recording in the lower-right corner.
- Stop Recording:
- Click Stop Recording when done. The video will be saved to your default location.
2. ScreenFlow (Paid, Professional)
ScreenFlow is a paid app with powerful screen recording and video editing tools.
Features:
- Record screen + system audio + microphone
- Edit recordings with transitions, zooms, annotations, etc.
- Perfect for educators and content creators
You’ll need to install the ScreenFlow Audio Driver during setup to capture system audio.
3. CleanShot X (Paid, Minimalist)
This is a cleaner, more user-friendly app for quick screen recording and screenshots.
Bonus Tips for Better Screen Recording on Mac
- ✅ Use headphones when recording to avoid echo or audio feedback.
- ✅ Keep your desktop clean to look more professional in recordings.
- ✅ Close unnecessary apps to reduce CPU usage and improve performance.
- ✅ Record in quiet environments to improve microphone audio clarity.
- ✅ Use an external mic if possible for better sound quality.


Leave a Reply